
I am not an expert at building container images, but I do have some experiences. These ‘experiences’ have led me to build containers in a certain way. There are many practices and approaches I use to make the final container easy to use and robust. There are also different types of container that I aim to build. One type of container I need is one that hosts python (flask) based RESTful services and possibly a static web application. I have created a template to produce one of these and I will describe how I use it to create a new container here.
Whenever I need a new container I actually build not just the container itself but an entire pipeline from initial creation of the python application, the release process including unit testing, building the container, testing the container and publishing the image to docker hub. I have an initial template of everything required to do this which offers a hello world service.
My requirements were
- Must have version number embeded in container
- Version number should auto increment
- Unit testing for python app
- Built containers need to be tested before being released
- Leverage Docker Hub auto-build function
- Python app must read environment variables settable when starting the container
- Variables must be expandable from files so I can leverage Docker secrets and Docker config features
- Swagger.json must be provided with optional swagger UI embedded
- (Optional) serve the frontend WebApp
- Use nginx in the container because flask webserver is not production certified
- Proper handling of sigterm to prevent pause on stopping containers
- Must be able to live behind a reverse proxy (like Kong) and still feed the client application the correct URL's. (Without relying on x_forwarded_* headers)
Container uses Swagger UI to provide a user friendly interface to the RESTful services
Steps to using this template to create a new container
Note steps are explained in the code formatting and commentary around them in normal text.
-
Create a github repository for the new container (Add a python .gitignore file)
-
Copy each file from https://github.com/rmetcalf9/baseapp_for_restapi_backend_with_swagger/t… into the new repository
This is going to give a container with a hello world application. More precisely an application that will respond to a RESTful service call with a JSON string – you can make this say hello world if you want but in this case I just return the container version. The release process for the container is documented in RELEASE.md. In the rest of this article I will go through the template in the order required to understand each step in RELEASE.md. By the end if should be possible to understand my method of building the python application and use it to build your own containers.
Python Application
Python applications need a little bit of boiler plate code in order to work nicely inside containers. For one thing when you issue a stop command on a container the SIGKILL (or SIGTERM) signal is sent to the container. Python apps by default ignore this and continue running. This results in the application not terminating and instead docker killing the container after a timeout. I have some standard code which handles this.
I won’t go into the full details of the python application (I will leave that to another post) instead I will just go through the important information that relates to the docker container:
- Source for App is in /src
- Tests are in /test
- I have created a library which contains a App class which contains reusable code required to deal with sigint. The app is based on an app class which inherits from this one. The entry point to the python application is app.py which creates an instance of the AppObj class and calls it's run method.
- The App takes no parameters – all parameters are supplied as environment variables. This allows applications to be configured with minimal changes to docker run scripts.
Python Application Services - Flask, Flask Rest Plus
The application uses Flask and Flask rest plus which are standard python libraries.
Flask is used for the Restful API’s. The application can be hosted behind a reverse proxy so it needs to know the external url. This is because if sometimes gives out http redirect messages and it must redirect the browser to an external url. The environment variables “APIAPP_APIURL”, “APIAPP_APIDOCSURL”, “APIAPP_FRONTENDURL” and “APIAPP_PORT” are used for this.
Flask rest plus allows us to define models for the rest API’s, generates swagger files and hosts swagger api’s for us. The API’s are hosted at “APIAPP_APIURL” and the swagger ui interface is hosted at “APIDOCSURL”.
/src/serverInfoAPI.py contains the initial API's. In the template it's just a hello world API but it is designed to be extended. Multiple API's can be registered. The parent class hides away the registration and each api can be registered in the appObj::initOnce function.
-
Have a look in /src/serverInfoAPI.py and find the text '''Get general information about the dockjob server''' - change this value to include the title of your application
Unit tests for the Python Application - continuous_test.sh
This application uses a python test framework called nose. There is a linux helper script called continuous_test.sh which will run the tests every time a file change is detected.
-
Run ./continuous_test.sh. You will have to install the python dependencies required for it to work. You should get to the point where you should see 3 tests run in 0.189 seconds (3 tests passed)
This is a little helper script I use whilst coding – the script won’t terminate you have to use ctrl + c to get out of it. Leave it running and change any file in the ./src directory. You should notice the tests are re-run. Tests are in the ./test directory, and so you can do TDD on this application by leaving this running and editing the files.
This script shouldn’t need to be run sudo unless changes you make to the python app requires this. (I have chosen a port above 1024 to run the server on otherwise it would need to be run as supervisor.)
Running the python app as a developer - run_app_developer.sh
As well as running the tests for the app we need a way to run the app itself as a developer and run_app_developer.sh is the script for doing that. A script is required because the app is designed to read environment variables and this script will take care of that for you.
You do need to set two environment variables on your development machine to run it, EXTURL and EXTPORT. These are the url and port you will enter into a browser to get to your development machine. I recommend using 8098 as the port. For some reason in my setup (possibly because I am using virtual box) using localhost as the url didn’t work. I ended up altering the hosts file on my development machine to point a random domain (somefunnyhostname.com) at 127.0.0.1 and this solved the problem.
| Variable Name | Example Value | Description |
|---|---|---|
| EXTPORT | 8098 | External port typed into the browser to access the API/apidocs/frontend. This may be different than the actual port the application uses if you are hosting the services behind a reverse proxy, or inside a virtual machine. |
| EXTURL | http://somefunnyhostname.com | The hostname typed into the browser to access the API/apidocs/frontend. This may be http or https. The python framework doesn't have support for https but you can put a reverse proxy in front which does. |
-
Setup the EXTURL and EXTPORT environment variables on your development machine and test they are working.
-
Inspect run_app_developer.sh. Take note of the lines that set APIAPP_APIURL and APIAPP_APIDOCSURL. You can change the paths these are served on if you like but for the first try I recommend you stick to defaults. Also note the APIAPP_PORT variable. This controls the port the webserver runs on. For simple setups this will match EXTPORT but if you have a reverse proxy or virtual machine it will differ.
-
Execute ./run_app_developer.sh. You should see Running on http://0.0.0.0:8098/ (Press CTRL+C to quit)
-
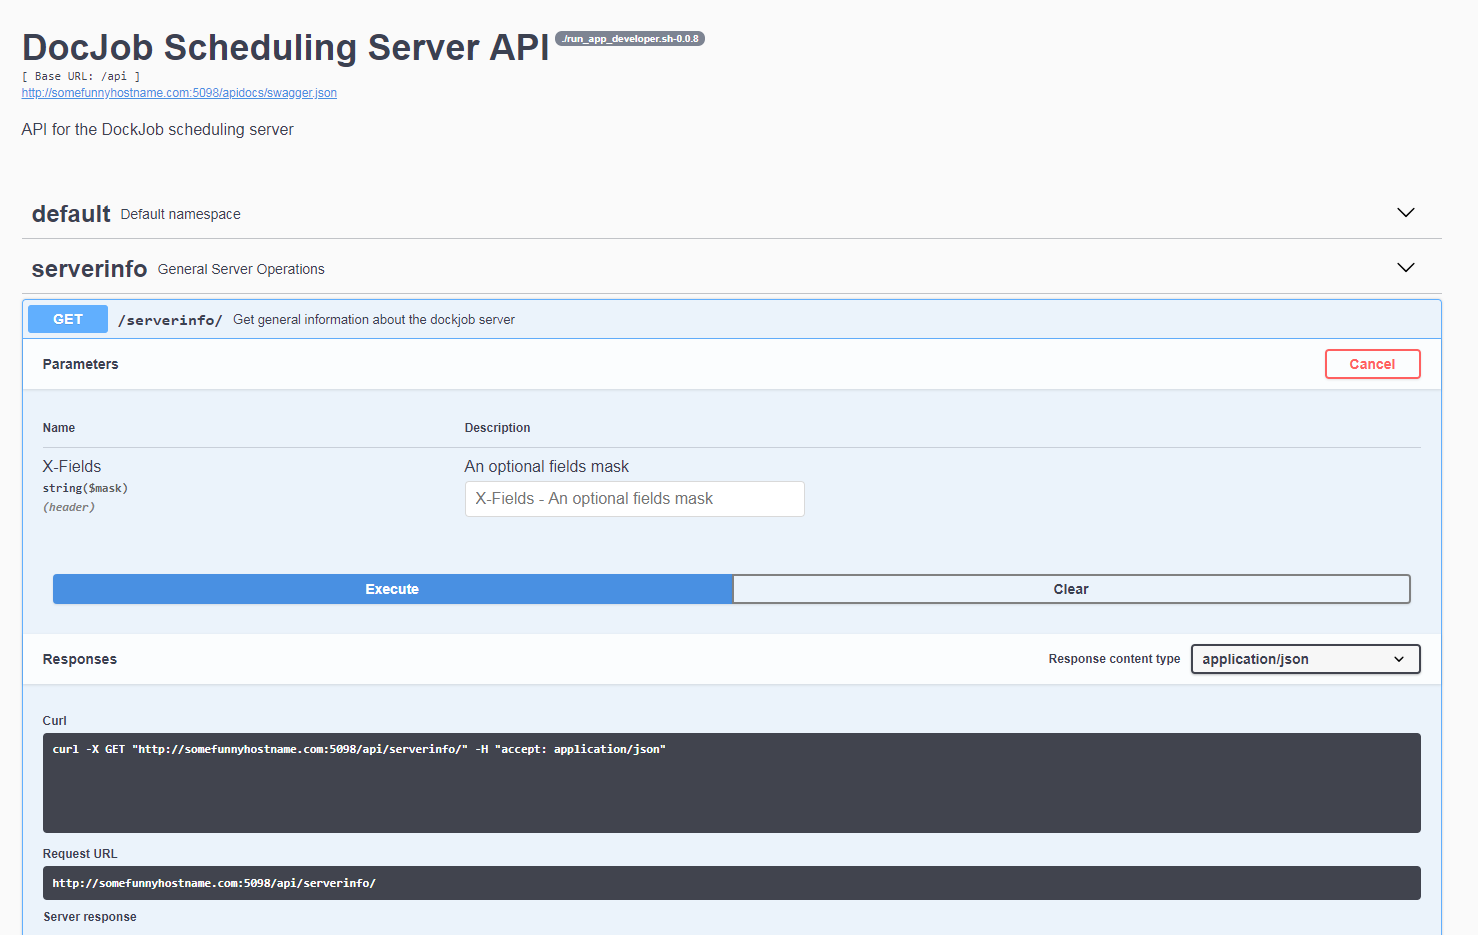
In a browser go to EXTURL:EXTPORT/apidocs (http://somefunnyhostname.com:5098/apidocs)
-
You should see a swagger UI page, note "./run_app_developer.sh-0.0.XX " at the top - this displays the version number and the method being used to run the application.
-
Expand serverinfo -> GET and execute the service. note it calls the /api endpoint. It should return 200 Success and have a simple payload with the Server version number
After completing the above steps you have been able to run the application in developer mode and test it out. Along with the previous script to run the unit tests you are now able to develop the python application and add features you require for your particular project.
Differences when running app in docker - run_app_docker.sh
You should have noticed that when we ran the developer version we got a warning: "WARNING: Do not use the development server in a production environment.". This is because we are using the flask built in http server. The container will use nginx instead and it connects to python using uwsgi. This is more robust.
This is the first difference between when running the application in developer mode and inside a container. The file run_app_docker.sh implements these differences and sets up the environment differently. Firstly it sets APIAPP_MODE to DOCKER so the application can set itself up to run differently inside the container if required. The python application will not accept any command line parameters and instead reads it's config from environment variables. This is useful because we can add new config options to the application without changing the image - we just need to set the new environment when starting the container. run_app_docker.sh also looks for any variables starting with APIAPP_ and ending with FILE. It then reads the content of the file into an environment variable called APIAPP_*. This allows us to read data from docker config and docker secrets. One use case is for storing passwords securely.
run_app_docker.sh is the primary process in the container so it also has to forward the sigterm signal to the python application.
-
Inspect run_app_docker.sh. Note APIAPP_FRONTEND, APIAPP_APIURL, APIAPP_APIDOCSURL, etc. are NOT set here.
Unlike run_app_developer.sh, run_app_docker.sh does not set most of the environment variables. This is because they are set by the docker itself.
-
Inspect Dockerfile and note the ENV lines that sets up the environment
-
Note the healthcheck curl command at the bottom
When the image is built default values for the environment variables are set. These can be overridden when running the container. The container also has a health check command set. This will send a get request to the server and make sure it responds. Docker uses this to monitor the state of the container.
Creating the docker image - buildAndTag.sh
The script dockerBuildAndTag.sh will build the image for you. You must setup two variables to make it work:
| Variable Name | Example Value | Description |
|---|---|---|
| DOCKER_USERNAME | metcarob | You username on dockerhub - used for the tag |
| DOCKER_IMAGENAME | myservicecontainer | Name for the produced image |
-
Open dockerBuildAndTag.sh
-
Change the lines to correct values:
-
DOCKER_USERNAME=todoenter
-
DOCKER_IMAGENAME=todoenter
-
Run dockerBuildAndTag.sh
-
run docker images and see the newly created image.
dockerBuildAndTag.sh handles incrementing the version of the image. It will tag the image it creates and will also add a tag to git and push it. This is used later by the Docker Hub auto build.
Run the following two commands:
-
docker create network pythontestingnetwork
-
docker run --network pythontestingnetwork --name mycontainer -p 8098:8098 -e APIAPP_APIURL="${EXTURL}:${EXTPORT}/api" -e APIAPP_APIDOCSURL="${EXTURL}:${EXTPORT}/apidocs" -d dockerusername/imagename:latest
Replace dockerusername/imagename with the values you are using. If you used a port other than 8098 you will have to alter the -p parameter.
Note: The run command feeds the URL and PORT as environment variables. These are picked up by the application. We can add any other parameters the APP required in the same way.
-
Use a browser and access /apidocs in the same way as you did when the app was running in developer mode.
-
Note the difference in the version indicator - you can tell it's running from the container.
-
stop the container using docker stop and docker rm commands
Now you have built the application and embedded it into a versioned container.
Testing the container (testContainer folder)
Unit tests are great but I have managed to release broken versions of my container despite them all passing. For this reason I have implemented container level tests. These tests rely on the container being started then they call the containers services. I have leveraged nose and python to run these tests although I could have used any tool that can call services.
The files required are located in ./testContainer. First we are going to build another container image whose sole purpose is to test the image we just created. I normally give this image a name that matches the previous image name but has ‘test’ added to the end.
-
cd to the ./testContainer directory
-
docker build . -t dockeruser/imagenametest:latest (Replace docker user with your docker username and imagenametest with the image you just created)
You should confirm that the image has successfully been built.
I chose to run container tests in another container to minimize complications with dependencies. It allowed me to skip lots of messing about with virtual env and it is more likely to work on other developers machines. Both containers can be connected to the same docker network to allow them to communicate.
Applications inside docker containers can talk to each other using the other container name as the host name. This way we can link up the two containers.
-
Run the main container using the previous step, (docker run command) and make a note of the container name you are using
-
Alter ./testContainer/test_main.py and the baseURL to be http://containername:port.
-
From the ./testContainer run the following command:
-
docker run --network pythontestingnetwork --mount type=bind,source=$(pwd),target=/ext_volume metcarob/virtualpresencepicturetest:latest nosetests --rednose /ext_volume
This runs the test container, connects it to the custom network and mounts the test directory as an external directory. It then runs the nosetests command to run the tests. If all is well you should see the tests run successfully. Unlike the main container, the test container terminates after the command is run – because the nosetests command terminates.
There are a few things to get right in this step, it’s a good idea to get it working and figure out what is going on as it demonstrates a few useful docker features.
Using Docker Hub Auto build
All the complex parts are behind us, now it is relatively simple to configure Docker hub to automatically build the container. Assuming you are hosting it in a publicly accessible github location.
-
Go to https://hub.docker.com and login
-
Create -> Create Automated Build
-
Select github account and the repository, fill in description and press Create
-
I set my build settings up with a single build of type “Tag”. The name and Docker Tag name match exactly the version. You need to set up the Dockerfile location.
My process to activate the build is documented in RELEASE.md, but basically I go to the build settings page, increment the Name and docker tag names to the version I just committed, press Save changes, then press Trigger. I then go to the Build Details page and watch the build complete.
Once you have gone through this walk through I recommend inspecting RELEASE.md and change the commands so they correctly reflect the process used to release the application.
Next Steps
Using this method it is reasonably quick for me to set up new python based REST API projects. Hopefully when I share this post I will gain some feedback in improving the process. I have some ideas for next steps to develop this further:
- Create some blogs about python rest plus and how I have used it in the framework
- Create some blogs about using the container to host a frontend application
- Improve the git workflow – maybe have the docker build automatically trigger
- Add some compose file examples showing the resultant container hosted behind a reverse proxy
I would love to hear feedback - feel free to dm me on twitter.