
How to install Personal Services on a Windows machine
To install personal services on a windows machine you should follow the following steps:
- Check Java is installed
- Download installer JAR file
- Run installer
- Check Initialization
- Post install clean-up
- Optional: Setup Servers to run on startup
Check Java is installed
Start a command prompt and run the following command:
-
java -version
If you see an error saying the command is not recognized you will have to install a JVM (or JDK) on your system. Click here for the oracle JVM. You will probably need the Windows x64 .exe version but this depends on your system.
Download installer JAR file
Start a command prompt in admin mode. To do this right click on the start menu icon for a command prompt and select “Run as Administrator”. The command prompt should have a red background.
Create a directory to install the program files to and change to that directory:
-
mkdir "c:\program files\PersonalServices"
-
c:
-
cd "c:\program files\PersonalServices"
Download PersonalServicesInstaller_Latest.jar and save it into the program directory.
Download CERT_current.jks and save it into the program directory.
Run installer
Run the installer from the Administrator console with the following command:
-
java -jar PersonalServicesInstaller_Latest.jar
The default settings will work for most setups. Make sure to note down the username and password for the First Admin Web Server user. (Normally the username is webSiteUser)
Note: On a windows setup the data home is set to a different directory than the application directory. This is so that the servers can be run by a non-admin user.
Check Initialization
A standard initialization can be checked by running the node server, then running the adminwebserver then logging into the webpage.
Run the Node server
Double click on
-
RunSingleNodeServer.bat
Leave the command window open.
Run the Admin Web Server
Double click on
-
RunAdminWebServ.bat
Leave the command window open.
Log into front-end and check
Open a web browser and visit https://localhost:8080/app/. (Alter the port number if you installed the Admin Web Server on a different port.). Login with the First User credentials you entered in the setup process.
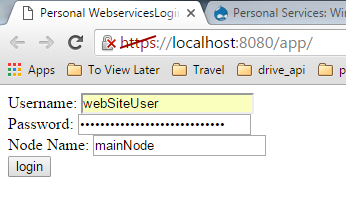
You should log in successfully and can now start configuring sockets:
TODO Pic of main screen
Terminate Servers
To terminate the servers you can click on the command windows and use ctrl+c to terminate them. If you wish you can continue to run the server by using the bat files. Alternatively you can follow the instructions below to set them up as windows services.
Post install clean-up
The setup process creates some helper files which run the setup processes for each component. These are helpful for advanced users who want to change their setup but once you are happy with the institutionalization you should delete them as accidentally running them may break the initialization.
Delete:
- SetupAdminWebserver.bat
- SetupAdminWebServKeystore.bat
- SetupConsole.bat
- SetupSingleNodeServer.bat
Optional: Setup Servers to run on startup
TODO